Open Shelving in the Kitchen: When It Works and How to Style It
By Tereza Hower | Published March 27, 2026 | Updated March 30, 2026
Open shelving in the kitchen is one of those design choices that looks effortless in photos and requires genuine effort in real life. The styled shelves of design magazines, with their perfect stacks of matte ceramics, matching glassware, and well-placed greenery, are a specific kind of aspirational image that can be achieved, but not without intention.
That’s not an argument against open shelving. It’s an argument for being honest about what it requires before committing to it. Done well, open shelving adds visual lightness, makes frequently used items easy to reach, and brings warmth and personality to a kitchen. Done poorly, it creates visual noise and a maintenance obligation that quickly becomes a source of low-level stress.
This guide covers when open shelving is the right choice, when it isn’t, how to install it, and how to keep it looking the way it did on day one.
Open shelving divides opinion among designers and homeowners alike. Here’s a clear-eyed look at both sides.
Why Open Shelving Works
- Visual lightness: Removing upper cabinet doors opens up the wall space and makes a kitchen feel less enclosed. This is particularly valuable in small or low-ceilinged kitchens where solid cabinet fronts can feel heavy.
- Accessibility: Items on open shelves are immediately visible and reachable. For frequently used dishware, glasses, and everyday pantry items, this is genuinely more convenient than opening and closing cabinet doors.
- Cost: Floating shelves are significantly cheaper than upper cabinets. For a budget kitchen renovation, replacing one or two runs of upper cabinets with shelves can free up meaningful budget for other priorities.
- Personality: Open shelves display what you own. If your dishware, glassware, and everyday objects are things you’ve chosen with care, showing them off makes the kitchen feel more personal and lived-in.
Why Open Shelving Doesn’t Work for Everyone
- Maintenance: Open shelves accumulate grease, dust, and airborne cooking residue faster than closed cabinets. In a kitchen that sees frequent cooking, especially frying or anything involving oil splatter, everything on the shelves needs regular cleaning.
- Visual discipline required: A styled open shelf needs to stay styled. The slightly off stack of plates, the out-of-place mug, the random item placed temporarily that never gets moved — these things are invisible behind a cabinet door and highly visible on an open shelf.
- Storage trade-off: Open shelves hold less than closed cabinets of the same footprint because you can’t use the space as efficiently when everything needs to look intentional. If your kitchen is already short on storage, open shelves will make that worse.
When to Use Open Shelving and When to Skip It
Good Candidates for Open Shelving
Open shelving tends to work best in these situations:
- Small kitchens where closed upper cabinets feel heavy and enclosing
- Kitchens with good ventilation that minimizes grease accumulation
- Households that cook infrequently or primarily use one cooking method
- People who genuinely own and use attractive dishware, not just whatever came in a boxed set
- Rental situations where adding permanent upper cabinets isn’t possible or practical
- A partial application, replacing just one or two sections of upper cabinets rather than eliminating closed storage entirely
Situations Where Closed Cabinets Are the Better Choice
- Households with young children who will reach for and move items on accessible shelves
- Frequent frying or high-heat cooking that generates significant oil residue
- Kitchens that are already storage-limited
- Households that want a lower-maintenance kitchen in general
- People who accumulate an eclectic range of kitchenware without a cohesive aesthetic
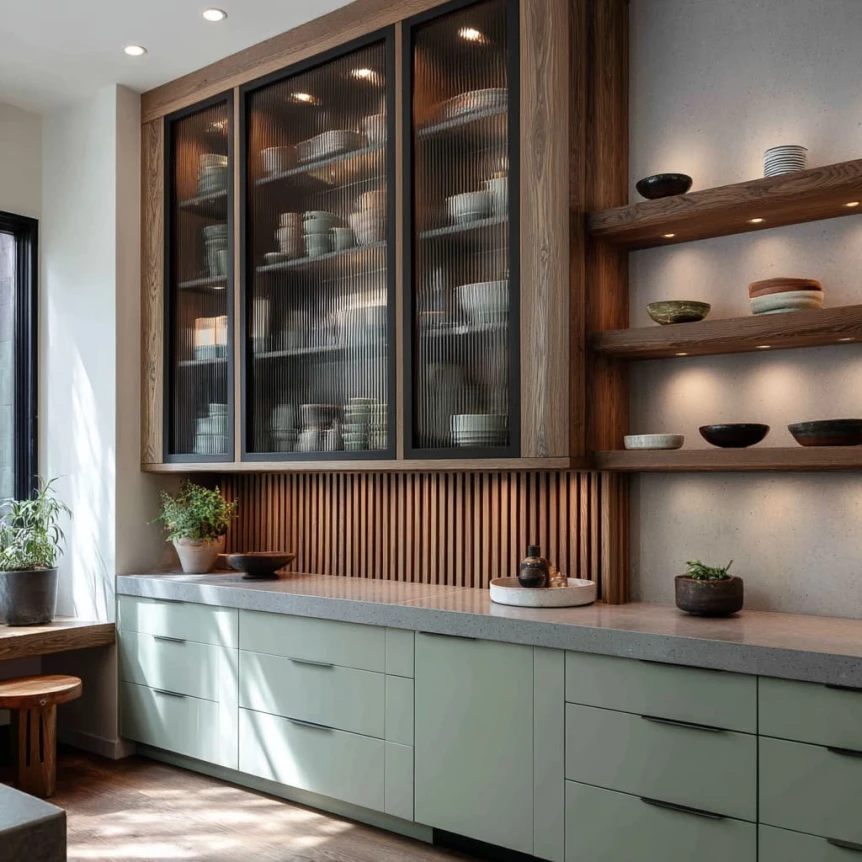
A hybrid approach is worth considering: keep upper cabinets on either side of the cooktop and sink where grease and steam are highest, and use open shelves in lower-traffic zones like the end of a run or beside a window.
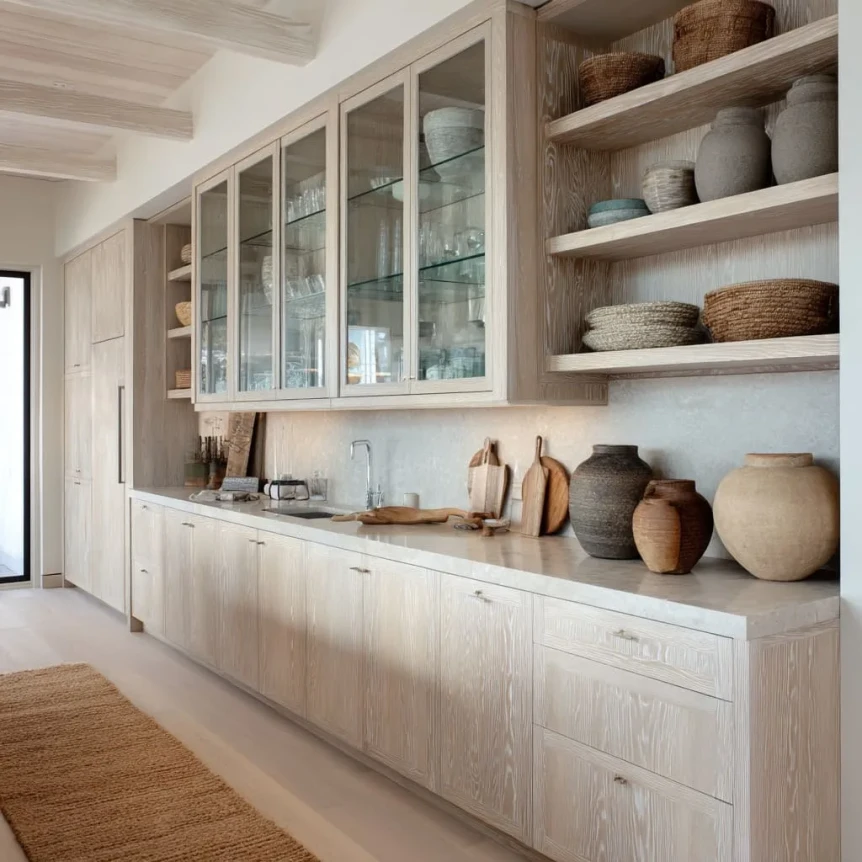
Shelf Materials: Choosing What Looks and Works Best
The material of the shelf itself contributes significantly to the overall aesthetic. The right choice depends on the kitchen’s style and how much weight the shelves need to support.
Solid Wood
Solid wood shelves, particularly oak, walnut, and maple, bring warmth and texture that suits most kitchen styles. They’re strong, durable, and look better over time as they develop a patina. The grain and tone of the wood will interact with the color of adjacent cabinets and walls, so choose a finish that complements rather than competes with what’s already in the room.
Painted MDF or Plywood
For a more built-in look, painted shelves in a color that matches the cabinets or walls can create a seamless appearance. This works well in modern kitchens where a consistent, monochromatic look is the goal. MDF is smooth and takes paint well but is less moisture-resistant than solid wood. Avoid using it near the sink without a protective finish.
Metal
Steel or iron shelves, often with visible brackets, suit industrial or raw kitchen aesthetics. They’re extremely durable and easy to clean. For a more refined look, thin powder-coated metal shelves without visible brackets, using hidden wall anchors, can work in strictly modern kitchens.
Reclaimed Wood
Reclaimed or rough-sawn wood adds character and a sense of history. It works particularly well in kitchens with an organic, handcrafted aesthetic. Very rough-grained wood can be harder to clean thoroughly, so a lightly sanded and oiled finish is more practical than fully raw wood in a kitchen environment.
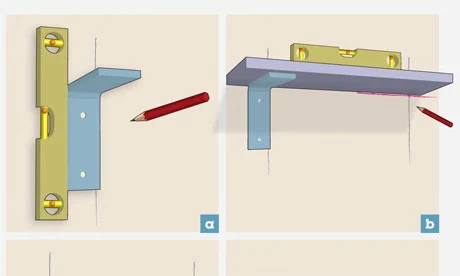
Installation: What You Need to Know
Floating shelves look clean because the brackets are hidden inside the shelf or anchored to a hidden cleat on the wall. This requires more precise installation than a standard shelf with visible brackets, but the result is significantly cleaner.
Finding Wall Studs
Kitchen shelves carrying the weight of dishware and canned goods need to be anchored properly. In stud-frame construction, anchoring into studs is the most secure option. If the shelf position doesn’t align with studs, use appropriate wall anchors rated for the weight you’re hanging. The weight of a full shelf of ceramic dishes adds up quickly.
Depth and Height
A shelf depth of 10 to 12 inches is practical for most kitchen items, deep enough for standard dinner plates and bowls without being so deep that items at the back get lost. For height between shelves, 12 to 15 inches gives clearance for most stacked items. If the shelves will hold tall items like a blender or a vase, plan for at least one gap of 15 to 18 inches.
Level Matters
A shelf that’s even slightly off-level becomes immediately obvious once items are placed on it. Use a quality level when marking and installing, and recheck before finalizing the anchors.
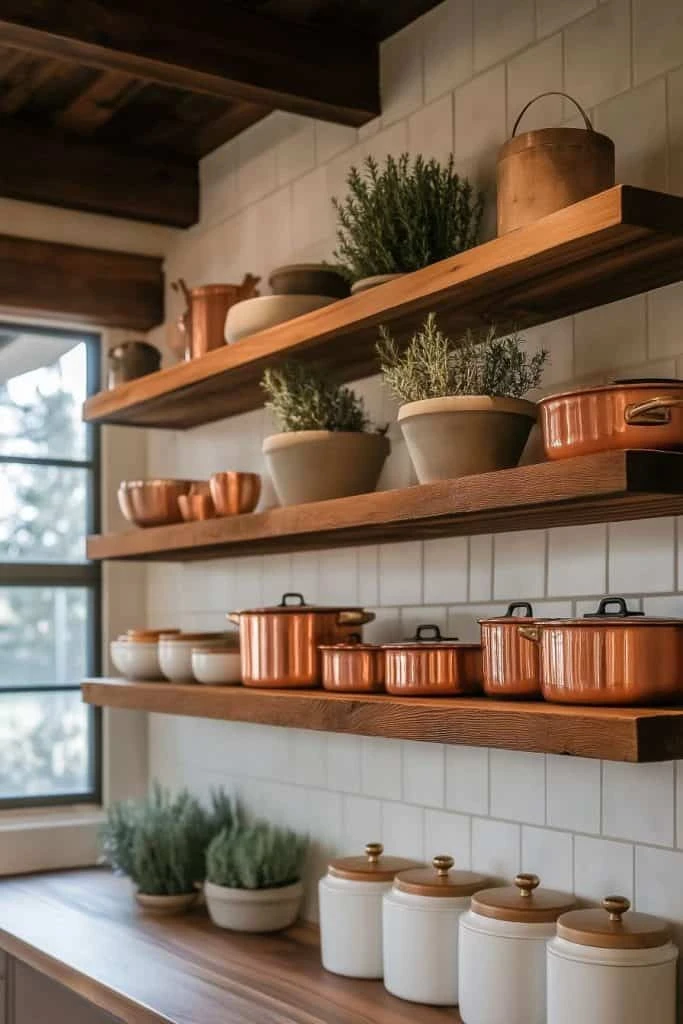
How to Style Open Kitchen Shelves
Styling open shelves well is less about following a formula and more about editing ruthlessly and grouping intentionally. Here are the principles that make the difference.
Start by Editing What You Own
Before placing anything on the shelves, decide what actually deserves to be displayed. Items that are mismatched, damaged, or simply functional rather than beautiful belong in closed storage. Open shelves work best when what’s on them is curated, not necessarily expensive, but chosen with some care for how it looks.
Use Repetition
Multiple identical or near-identical items, a stack of white bowls, a row of matching glasses, three small ceramics in the same palette, create a visual rhythm that reads as intentional. One-of-a-kind pieces work as accents within this rhythm but not as the entire approach.
Vary Height and Form
Shelves with items that are all the same height look static. Mix taller items like a vase, a bottle, or a stack of cutting boards standing upright with lower ones like stacked plates and small bowls to create visual movement. Leave deliberate negative space. Empty shelf is part of the composition, not a gap to be filled.
Add One or Two Non-Kitchen Elements
A small plant, a candle, or a simple object that isn’t obviously kitchen-functional gives the shelf a more curated, personal quality. One or two of these go a long way; more than that starts to read as clutter.
Maintain It Regularly
Open shelves need a wipe-down roughly once a week in an active kitchen. Set that expectation from the start. Items that get rearranged or replaced should be put back with the same intention as the initial styling. The maintenance habit is what separates shelves that look good long-term from shelves that gradually become visual noise.
For more on designing your kitchen from the ground up, see The Complete Guide to Modern Kitchen Design (2026). If you’re choosing open shelves partly to keep a kitchen looking lighter, our Kitchen Color Schemes guide covers how shelf and cabinet colors interact. For storage planning that complements rather than competes with open shelving, read our Kitchen Organization and Storage guide. Small kitchen layouts often benefit most from open shelving, so see Small Kitchen Design Ideas for specific guidance. And for how lighting can make open shelves look their best, see Kitchen Lighting Ideas.
Frequently Asked Questions
Is open shelving in the kitchen practical?
It can be, with the right expectations. Open shelves are genuinely practical for frequently used items since dishware, glasses, and everyday pantry goods are easier to access and see on open shelves than behind cabinet doors. The practical challenge is maintenance: open shelves collect grease and dust faster than closed cabinets and need to be cleaned and restyled regularly in an active kitchen.
How do I keep open kitchen shelves looking tidy?
The key is starting with less than you think you need on the shelf, not more. A shelf that’s about 60 to 70 percent full looks intentional; one that’s packed looks cluttered. Use matching or near-matching items for the functional pieces, add one or two personal touches, and do a quick wipe and restyle weekly. The discipline is the same as keeping any visible surface in good order.
What is the best wood for kitchen open shelves?
Oak is the most popular choice for kitchen shelves. It’s durable, takes stain and oil well, and has a grain that suits a wide range of kitchen styles from modern to rustic. Walnut is a richer, darker option that works particularly well in kitchens with warm or moody color schemes. Maple is a lighter, more neutral option. Avoid particleboard or untreated MDF near moisture. If painting, seal the surface with a water-resistant primer first.
How much weight can floating kitchen shelves hold?
It depends on the anchor method and wall construction. Shelves properly anchored into wall studs with appropriate hardware can typically hold 50 to 80 pounds per bracket, which is more than sufficient for dishware and pantry items. Shelves using drywall anchors are rated for significantly less. Always check the weight rating of your specific hardware against the estimated load before installation.
Can you replace all upper cabinets with open shelving?
You can, but for most kitchens it’s not the most practical choice. Replacing all upper cabinets with open shelves dramatically reduces storage capacity since items need to be displayed rather than just stored efficiently. A better approach for most households is a hybrid, keeping closed cabinets in high-use or high-grease areas and using open shelving selectively where the visual and accessibility benefits are highest.
Start with One Section
If you’re considering open shelving but not entirely sure, the best way to test it is to start with one section rather than committing throughout. Replace one run of upper cabinets, style it with care, and live with it for a few months. You’ll know quickly whether the aesthetic reward is worth the maintenance trade-off for your household.
Most people who try open shelving selectively end up keeping it. Most people who replace all their upper cabinets with open shelves end up wishing they hadn’t. A hybrid approach is almost always the more satisfying long-term choice.
For the full kitchen design roadmap, head back to The Complete Guide to Modern Kitchen Design (2026).